maandag 18 februari 2013

DIY - Leather Jacket

We never throw anything away and this DIY is the reason why!
All you need is:
- Old (Leather) Jacket
- Studs (On this jacket I used the round ones in different sizes, you can buy them at www.gostuds.nl)
- Pincers
 
I really loved the zippers on this jacket. So I wanted them to stand out by adding some studs around them. On the back you can make your own patron. Whatever you like! On this jacket there was some nailpolish blemish on the back so I wanted to cover it up with the studs. Our tip is to put the studs also at the far end of the sleeves. It really gives a nice effect when you are wearing gloves or something like that!
We are very happy with the results!!
Front View
Back View. 


Did you also make a DIY Jacket? Please send us an e-mail with a photo of your creation. We would love to put  them on our blog!
theprojectladies@gmail.com 


Almere (Primark), it is!


New Clothing. Love the Jacket! Everything is from Primark Almere except the Black Sweater. It's from Only.
Got to love this details on this sweater!
We love hats on sale!(from left to right; Grey(Bershka, Sale Item €2,99), Black(H&M, Sale Item
€1,99) Brown & Black Hat (New Yorker, Sale Items
€2,99))


New Accessoires all from Primark!
Boots! Long black ones are from Van Haren(€34,95). Brown short ones are from Primark (Sale item, for only 7,-)
Accessoires from Primark! Except the little card with 2 pair of earrings on it.
Sunglasses! All from Primark!
New Bikini's. Couldn't decide which one I liked  most so I took all 3 of them.

Mission: New closet

Project "clothing space"

Since yesterday I am the proud owner of a new build-it-yourself closet. And yes, it was a hell of a big project. Because before you get to construct the new one, you have to demolish the former ones. I had two, white, standard closets. They came with the house. So they were really up for replacement.
To give you an idea what my former situation was.
The project started with selecting and buying a new closet. I had seen one on the internet I really liked so I went to the store with my parents to check it out. After about ten minutes we figured that the one I picked was the choice, so we decided to buy it. (Well, actually my parents bought it as I am getting the closet as an early birthday present :) )

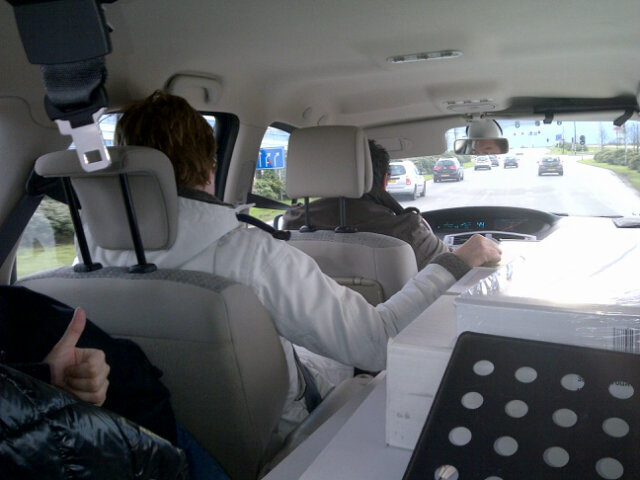
First project problem: How were we going to fitt the three large heavy(!!) parcels into the car + fit ourselfs in? Well it happens to be that my dad is a real man's-man. His 'spacial awareness' is above average and he was able to fit us all into the car!

The way home, could have been more comfortable though..
We got home safely and after unloading the stuff I faced the next problem: cleaning out my old closets.. I found out that I own a lot of stuff, seriously, I could begin my own shop.

I had two closets, and a load of stuff piled on top of them so it was a nice err, 'challenge' to clean them out. As pictures can explain more than words...


Not only was there stuff on the bed, also under and next to..

My boyfriend helped out, also my little nephew really wanted to help us 'build'.

Where the closets used to be, now an empty space..

Not even half way.. The bottom is at the left and the top is at the right..


Then we faced the next problem: the guide wanted us to build the entire closet flat on the ground. The whole 180 x 206 cm.. Which ofcourse wouldn't fit on my bedroomfloor. So we had to come up with a solution, as you can see on the photo on the left we did come up with a solution. A rather good one, we decided to build it sideways and turn it later on. With some extra muscles provided by my parents we managed to get the closet in the right place with the right side up.


You might notice that the next time leap is a rather big one, please understand that I can't make photos while supporting the whole d*mn closet and constructing the doorpanels while puzzling on the floor.. ;)

All in all, here's the result! -->
And I have to say I'm really pleased with it. It turned out exactly the way I wanted it to and there was still room to fit my shoe cabin next to the closet! :)

dinsdag 12 februari 2013

DIY - Everyday smoothie

Fruity vitamines

Zin in echt iets lekkers? Maak je eigen gezonde en heerlijke fruitshake. Volg de volgende simpele stappen:
//
In for a real tr
eat? Make your own healthy and delicious smoothie. Follow these easy steps:

Wat heb ik nodig? // What do I need?- Een blender
- Bananen
- Sinaasappels of sinaasappelsap
- Bosvruchtenmix (diepvries/bevroren)
//  
- Blender
- Bananas
- Oranges or orange juice
- Mixed red fruit 
(frozen)

Begin met het snijden/breken van de bananen en stop ze in de blender.
// Start by roughly chopping up/breaking the bananas and put them into the blender.

Voeg het sap van de sinaasappels toe // Add the orange juice 
 

 Als laatste voeg je ook de bosvruchtenmix toe, wanneer je de bevroren variant gebruikt moet je deze wel eerst ontdooien in b.v. de magnetron.
// Last step is to add the red fruitmix, make sure to defrost the berries is you are using the frozen ones.


 Blenden maar! // Mix it up!


 Schenk je fruitshake in een groot glas, genieten maar!
// Pour the smoothie in a big glass, enjoy!


maandag 11 februari 2013

Today's Quote

Whatever you are, be a good one! (Abraham Lincoln)

Daily Naily

Nail Polish Heaven


Here are some new catches for my nailpolish collection! <3

(from left to right)
  • Hema 
  • Rimmel London Pro (up to 10 days)
  • Essence Colour & Go, nr 126 Date in the moonlight.
  • Essence Nail Art, Special Effect, nr 13 Mrs & Mr Glitter
  • Essence Nail Colour, Left Side, Midnight Date
  • Essence Nail Colour, Right Side, City That Never Sleeps 
 I really love the red one of Rimmel London. I wear this colour almost every weekend!

 Essence is a really cheap brand and that is why you can really experiment alot.


These are on my wishlist to try next month:

Caviar Pearls by Ciaté
Metallic Silver/ Very me Night Fever by Oriflame
 

donderdag 7 februari 2013

DIY - Denim Short


Wat heb je nodig? // What do you need?
 
- Ongeveer 30 piramide studs 7mm zilver
- Oude Spijkerbroek
- Potlood
- Schaar
- Eventueel een tang
- Chloor
- Emmer
- Water

//

- About 30 piramide studs, 7mm silver

- Old jeans
- Pencil
- Scissors
- Might want to use pincers

- Bleach
- Bucket
- Water


Stap // Step 1:
Pak een oude spijkerbroek uit je kast! // Get some old jeans out of your closet


Stap // Step 2:
Knip de broekspijpen op de lengte hoe jij ze wilt hebben. // Cut the legs at the desired length

Stap // Step 3: 
Knoop allemaal touwtjes in een willekeurige manier om de short heen voor
het warrige bleek effect. // Randomly tie little strings of rope around the shorts for the messy bleach effect.

Stap // Step 4: 
Doe de chloor in de emmer en maak deze aan met water. (Ongeveer 1/3) // Put the bleach in the bucket and mix it with water, about 1 part of bleach on 3 parts of water.

Stap // Step 5:
Laat de short net zo lang in het chloor mengsel zitten tot het naar jouw
smaak genoeg gebleekt is. // Leave the shorts in the bleach mixture untill desired bleach effect is reached.

Stap // Step 6:
Was de short goed uit en laat deze drogen. // Carefully wash out the bleach and let the shorts dry.

Stap // Step 7:
Bepaal waar jij je studs willen hebben. Ik zelf vond ze erg leuk om aan de
voorkant langst de zak rand te doen! // Decide where you want to place the studs. I particularly liked to put them around the pocket's edge.


Veel plezier met jouw nieuwe short!
Enjoy your new shorts!


woensdag 6 februari 2013

Welcome // Welkom

Hi there!

Wij zijn The Project Ladies en welkom bij een klein stukje van onze wereld.

Deze blog is bedoeld om onze creatieve uitbarstingen een plekje te geven, om onze ideeën te delen en onze melige momenten vast te leggen.

Enjoy!

//

We are The Project Ladies and welcome to a little part of our world. This blog is meant to give a place to our creatieve outbursts, to share our ideas and to capture our funniest moments.